Is it easy to do Venetian Plaster Finish?
Traditionally, a Venetian plaster floor did its impact through the use of special substances utilized with the aid of a knowledgeable craftsman. Fortunately, more modern merchandise has made it viable for do-it-yourselfers to create comparable consequences in simply a few steps and with no different training.
15 Step how to Create a Venetian Plaster Finish by yourself
We all known that, some Venetian Plaster produces an attractive and elegant 3D finish that enhances the light and dark tones of the same color.
For Best Results:
Before you begin, make sure you clean and prepare your walls and protect your furniture. These Venetian Plaster should be applied only on primed surfaces or on surfaces previously painted with an Eggshell or lower sheen of paint.
Starting a project with a clean, prepped workspace will help ensure that the painting or Venetian Plaster finish process runs smoothly from beginning to end.
For Our Best Results: When removing items such as picture frames and light fixtures, tape the screws to the back of each object to avoid losing them during the project. Don't underestimate the importance of eliminating dust, cobwebs and mildew before beginning your painting project.
Step 1:
Create a workspace by removing items such as rugs and furniture.
Step 2:
Create a central area for all your tools and supplies; make sure it is easily accessible to your workspace.
Step 3
Remove what you can such as doors, light fixtures, pictures, doorknobs and nails.
Step 4:
Protect what you can't remove with coverings such as plastic sheeting or masking paper.
Step 5:
If you have cracks or small holes, remove any dust or debris from the area, then apply patching material and allow it to dry completely. Sand the finished area so it blends evenly with the surface.
Step 6:
If you need to remove peeling paint, scrape the area with a wire brush or scraper to remove all the loose paint, then sand the finished area to blend it evenly with the surface.
Step 7:
For gaps and seams, remove excess debris, apply caulking to the area and allow it to dry completely before painting.
Step 8:
On glossy surfaces, such as metals and when painting over higher sheen paints, scuff sand or etch the area to provide proper paint adhesion.
Step 9:
If you need to remove any oil, grease or wax stains, apply a mild detergent with a sponge onto a lightly water-dampened surface, rinse with clean water and allow it to dry.
Step 10:
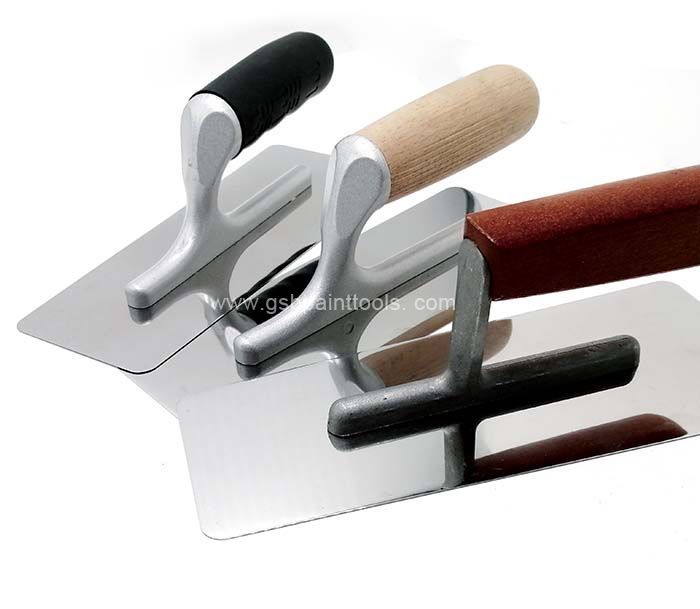
The application items you'll need include a flexible 10 cm steel trowel, 100 grit and 400-600 grit sandpaper, a deep-well paint tray, Stainless Steel Venetian Trowel SB-405B6 or Stainless Steel Venetian Trowel SB-405B, and Venetian Plaster and optional Venetian Plaster Topcoat.
Step 11:
Begin by rounding the corners of a flexible steel trowel using 100 grit sandpaper to reduce edge marks during application.
Step 12:
Load Venetian Plaster onto the steel trowel and start at top corner of your wall. Holding a steel trowel at a 15 - 30 Degree angle, spread a thin layer of Venetian Plaster onto the surface using long and short random strokes. The original wall surface should peek through in certain areas, and wipe off the steel trowel often to avoid dry bits of Venetian Plaster from affecting your pattern.
Step 13:
Continue this process until the wall is completely covered. Allow the first coat to dry for 4 hours before applying a second coat.
Step 14:
Return to the original starting point (top corner) of your wall and apply a thin second coat of Venetian Plaster over the first coat. Hold the steel trowel at a 30-60 Degree angle and use long and short overlapping strokes to achieve an irregular look to the final finish and fill in voids and recessed areas while covering the original surface completely. Smooth away edge marks with a trowel.
Step 15:
Continue this process until the entire surface is covered. The colors used in this room are: On Thin Ice and White Fur.
6 Top Tips for Venetian plaster application:
1 Top tips: Use the right tools
Ever heard the expression a bad workman blames his tools? Well, when it comes to applying venetian plaster the expression fits. You need to use the right tools because they dictate how easy applying and smoothing the plaster is. You’ll need a steel trowel or 6-inch drywall knife, 400-600 grit sandpaper and the plaster itself. To cover the floor, use a dust sheet. You should clear the room as much as possible too.
2 Top tips: Preparation
The walls have to be imperfection-free. If there are some-holes they need filling. If there’s rough-textures they need sanding. If there’s dirt and grease it has to be cleaned away. The plaster needs a smooth and clean surface to adhere properly. If your walls are painted, you can plaster directly over them but if the paint is glossy that you’ll need to sand the paint to remove the sheen. Round off wall corners with sandpaper to avoid cutting into the plaster with your trowel. This is a common oversight people make.
3 Top tips: The first coat
The first coat isn’t the most important for surface finish, however it does dictate how much effort is required to create a perfect finish in the next coats. Start at the corner of the room and apply a thin coat of plaster using your drywall knife. If the plaster is so thin that you can still see some wall behind that’s absolutely normal. Keep applying the plaster. Spread it thinly but evenly. The aim here is to ensure the surface is smooth. Once you’ve covered the wall, leave it to dry for a minimum of 16-hours.
4 Top tips: The second coat
The second coat effectively fills in the first. If you achieved good smoothness with the first coat, it’ll be easier to apply the second coat consistently. Apply the second coat in the same way, starting from the corner. Apply a thin and even coat. Use long and short strokes to maintain even coverage. Once you’ve completely covered the wall, allow the second coat to dry for at least 24-hours. Return the next day.
5 Top tips: The third coat
It is not always necessary to apply a third coat however high-end applications demand it for a flawless finish. You can skip this step if you are happy with the plaster finish. Venetian plaster is exceptionally durable and will last for a long time with just two coats. If you do choose to apply a third plaster coat, use the same technique as for the second. Start from the corner and work your way inwards.
6 Top tips: Polishing
Venetian plaster can be polished by hand or by machine. The truth is polishing by machine is much faster and offers a great finish. Polishing by hand is the traditional method but offers no better results. There are special plaster finishing machines you can use but you can use a rotary polisher designed for car bodywork. You just use a specific pad. It’s important not to over polish the plaster. Take your time to get the sheen even.
An Everything You Need to Know the best 5 Guide in 2022
The Venetian Plaster, which has been used to finish walls since ancient times, made its first comeback with the unfortunate "Tuscan" decorating movement of the ’90s that we're all still trying to forget. But don't write it off! Venetian plaster has been increasingly used in homes of style in 2020, thanks to the popularity of plaster-loving designers.
Guide 1: Why the comeback?
Many people think there’s been a resurgence in plaster in general, not just Venetian plaster. Recently, there have been technological advances in the composition of lime plaster that have made it much easier to use.
So that, it’s becoming more prevalent and more and more people are getting exposed to it. It's going viral! But I also think there is an enduring and increasing appreciation for natural materials in design. There’s a growing focus on blurring the architectural line between indoors and out. And lime plaster is quite literally the earth on your walls.
Guide 2: What colors are most popular?
white, beige, gray, brown, and black. But the most favorite is white.
Guide3: What is the look and feel Venetian plaster lends a space in 2022?
The look is earthy and soft, and the application in thin translucent layers creates an iridescent finish, giving the appearance of depth and movement.
Guide4: Why do most people like using Venetian plaster in 2022?
The interplay of natural light and lime plaster is exhilarating. It appears as if there's simultaneously a warm light emanating from within the plaster and a vibration of light hovering above it. The effect is a feeling of lightness and stillness in the space. It's these qualities that pair so nicely with a minimalist aesthetic. The plaster both warms up a pared-down space and enhances the focus on the essential.
A lot of people are working with that aesthetic combination on their current projects. We're applying a single color of off-white plaster to the entire house, including all the interior doors. It's a look mastered so beautifully by some home designer, where the interior doors blend into the walls seamlessly. To achieve that uniformity, we need to install your doors with kerf jambs instead of the traditional jambs that require moldings. The end result is a sort of visual silence.
Guide5: What are some upsides and downsides a homeowner should know about before springing for Venetian plaster?
The new products are very low-maintenance and very durable. You used to need to re-plaster a whole wall to cover one scuff or blemish, but those days are gone. Today there's an array of lime plasters that can be easily repaired in patches and then blended with the rest of the wall.
Most minor scuffs can be removed with a damp cloth and mild detergent, or a light sanding of the surface with 1000-grit sandpaper or a fine steel wool. It’s a lot lower-maintenance than people think, pretty much as flexible as paint in terms of application and maintenance.
Plasters with aggregates, however, are a bit higher-maintenance. It's trickier to fix blemishes without leaving a mark, so it may be necessary to re-plaster the entire wall to hide the blemish perfectly. Also in applying them, it's necessary to complete a whole wall, corner to corner, in one go. So you lose some of that flexibility.
In these DIY project you will learn how to correctly fill plasterboard joints if you are intending to decorate straight over plaster boards without plastering them first. Using special paper tape and layering your filler will allow you to cover any joints fully and ensure they don't crack leaving you with a perfect invisible joint.
Decorating plasterboard is not so different to decorating new plaster in terms of the preparation work required as it is as porous if not more than new plaster, however unlike decorating new plaster you also need to fill over all the plasterboard joints and screw holes if you are simply going to paint or wallpaper straight on to the board.
By taking your time and using the correct products you can get a finish that is as flat and smooth as a freshly plastered wall without the expense of actually having to plaster it.
If you are not going to plaster your recently installed plasterboard or drywall and just want to fill the joints, to get the smoothest finish possible it is important to use tapered edge plasterboard.
As the title suggests the edges are barely tapered, so that when the boards are butted up collectively there is a mild melancholy of the place they meet. This lets you fill this despair with a plasterboard joint filler and cover the joint.
It is possible to fill over and hide standard square edge plasterboard joints if you are working with an existing plasterboard wall and that’s what has been used, but if starting from scratch always try to use tapered edges boards.
The ivory side of normal plasterboard is a little smoother than the brown side. This makes it a little easier to get a good finish when decorating but the difference is barely noticeable. If you are constructing a plasterboard stud wall from scratch fix all of your boards with the lighter face facing into the room as you will get a slightly better finish, but this will be barely noticeable to the naked eye.


